


Home / Blog Center / Chargers / Step-by-Step Instructions for Replacing a Faucet
Step-by-Step Instructions for Replacing a Faucet
14/02/2025 | Hawkrown
Replacing a faucet at home can become necessary over time due to wear and tear, clogs, or corrosion. These issues not only affect the appearance of the faucet but also impact its performance. For old or damaged faucets, a replacement is required. So, how do you change a faucet? Let's explore this topic together!
How to Replace a Faucet
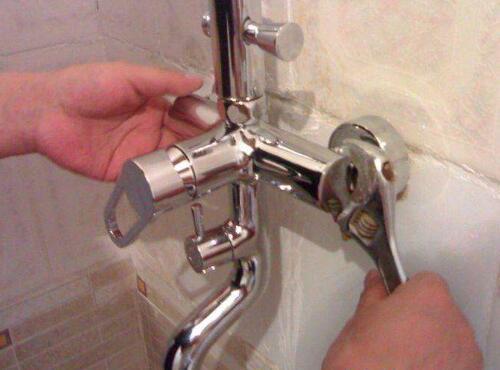
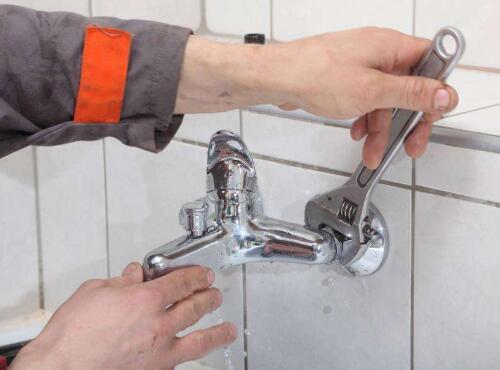
First, turn off the main water supply and open the faucet to drain any remaining water. Next, slowly use a knife to remove the protective cap from the faucet handle and use a screwdriver to unscrew the screws on top. Finally, carefully remove the old faucet and install the new one to complete the process.
What to Pay Attention to When Using a Faucet
1. When using the faucet, avoid using excessive force to turn it on or off. You only need to gently twist it. Using too much force can damage the handle, making it difficult to operate the faucet.
2. After the faucet is installed, clean its surface to remove any stains. If the water that comes out is murky, make sure to clear the dirty water before using it.
3. Regularly clean the faucet to remove impurities. Over time, the faucet can accumulate scale, which if not cleaned can lead to clogs and contribute to secondary contamination of the water quality.
4. When cleaning the faucet, avoid using harsh materials like steel wool or metal scrubbing pads. Instead, use a soft cloth to wipe it clean. For stubborn stains, you can use some neutral cleaning agents that won’t damage the faucet.
5. If the faucet is equipped with a hose, try to keep the hose in a naturally extended position during use. Avoid bending or folding it to prevent damage to the hose.

In conclusion, I hope the above information on how to replace a faucet has been helpful for you. For more related content, please stay tuned to Hawkrown.com.
